Tutorial – Python unit test with Eclipse (1)

In this article, I will walk through how to set up and do a python unit test with Eclipse.

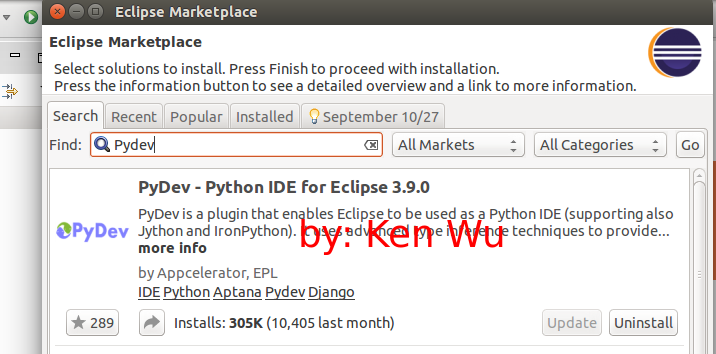
Prerequisite: Pydev has been installed in Eclipse. If not, please open up the Eclipse and go to: Help -> Eclipse MarketPlace and search for ‘PyDev’ and install it as below

1
Now, we are ready to create a python unit test. To start with, let’s create a new PyDev Project for holding the project source and the unit tests.

1) We go to: File -> New, in the New window, choose PyDev Project as below

2

and give the project a name, such as TestPython

2) In the project TestPython, create a new python module on top of it in order to have all our unit tests placed inside this model.

3

and give the package as test and name as testCalculator

3) We now have the generated package: test and two files created. In theory, we can put as many unit tests in this package. In the testCalculator.py, put the following code there
import unittest

class TestCalc(unittest.TestCase):

def testAdd(self):
print("it is a test")
result = True
self.assertEqual(result, True, "Ohno")

4

Basically, in the above code, we just created a test class: TestCalc which extends the unittest.TestCase as the base class and the TestCalc class will have all the testing API available such as self.assertEqual..etc. For more information of the API of unittest, please feel free to refer: https://docs.python.org/3/library/unittest.html

4) The last step would be to just right click the testCalculator.py in the Package Explorer and choose Run As -> Python unit-test. If the setup is correct, we should see something like this:

5

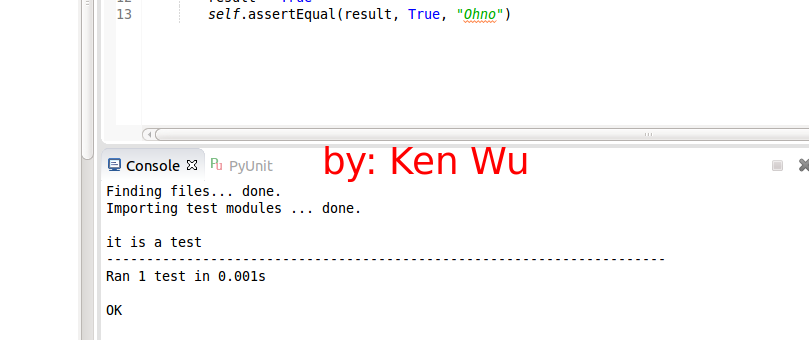
And yes, congrats! you have just created the basic python unit test!

Stay tuned and more to come (such as running it in the command line instead) later!

Tutorial – How to debug the Neo4j graph database locally using Eclipse

This past weekend I spent most of my time trying to get my dev environment mostly setup and knowlege polished up. One of the thing is to build the Neo4j (it is the by far the most popular and leading graph database) source code on my machine and study internal how it works, mostly because i would like to get myself prepared at the projects from my work that are extensively dealing and analyzing with billion of data nodes currently in the production environments and of course, if i have time, i would like to make some bug fixes and enchancment contributions to its repositority. Well, anyway, as always, the best way to get a feel how a thing works is to watch how a piece of data coming in and out -> Yes, the debugger again! In this article I will give a tutorial how to set this up on the Neo4j server community version on my local.

(Note that in order to get the most out from this tutorial, it is assumed that you have already had some basic idea of using Neo4j and its WebAdmin tools. I strongly encourage you to spend some time to take a look at their developer site and learn it now: http://neo4j.com/developer/guide-neo4j-browser/)

Step 1) Download the Neo4j Community Edition (2.1.5 as of today) at http://neo4j.com/download/ and follow the instrcutions to extract it.

Step 2) Assuming it is extracted to the /usr/local/neo4j-community-2.1.5, open the conf/neo4j-wrapper.conf file and add the following line:

wrapper.java.additional=-Xdebug -Xnoagent -Xrunjdwp:transport=dt_socket,address=5005,server=y,suspend=y

Step 3) Download the Neo4j source codes from its GitHub account at https://github.com/neo4j/neo4j.git

git clone https://github.com/neo4j/neo4j.git

Step 4) (Recommended) Since the Neo4j version i downloaded in above was 2.1.5., in order to make the source code consistent to the one i downloaded in step 1, I need to switch the working branch to 2.1 maint as well by issuing the following command:

git checkout -b 2.1-maint origin/2.1-maint

Note that the 2.1-maint was from their github site:
github

Step 5) Now import all Neo4j source codes (actually they are all the maven projects) into the Eclipse

Step 6) In Eclipse, create the remote debug configuration and has it listen to the port 5005 in which we specified in Step 2

eclipse

Step 7) Run the configuration that you just created in Step 6)

Step 8) Now we can set the break point anywhere. Let say we set it at the JmxService.java’s getBean() method and if we go to the http://localhost:7474/webadmin

webadmin

We should have the the script paused as below:

eclipse

Tutorial: Setting up a python debugging environment in Eclipse

As being a savvy programmer, it is vital to have a debugger along with the development. Today I spent two+ hours configuring the python debugger in the Eclipse IDE. (Yes, i feel a need to set it up as i just started dealing with the massive python scripts at my work). After nailing it down i would like to share how I set up.

Prerequisites:

1) Eclipse IDE installed. (At the time of writing, I am using Eclipse Luna 4.4 version)
2) Pydev Eclipse plugin installed. (http://pydev.org/download.html)

Then, depends on which way we want, we can do:
–To debug a remote program
1) Inside the Eclipse, start the remote debug server. If we don’t find it in the tool bar, we can go to Window > Customize perspective > Command groups availability > PyDev debug

2) In the external python script, put these two lines at the begining:

import sys;sys.path.append(r’/Users/ken/eclipse/plugins/org.python.pydev_3.0.0.1388187472/pysrc’) #assuming this is the pydev installation path
import pydevd

3) In the external python script, put this line anywhere you want to have the program paused at the debugger:
pydevd.settrace();

3) Inside the Eclipse, go to the debug perspective

4) there you go, you should be able to pause the execution at where you put the statement at in step 3) above

–To debug a program inside a Eclipse
This is much more easier than debugging a remote program. It is pretty much like debugging a java program in Eclipse.

1) Create a debug configuration: Go to Run -> Debug Configurations -> Python Run, create a profile accordingly

2) Hit Debug